Thursday, March 15, 2018

Dining Room Spring Tablescape

Happy Thursday friends! Who's excited for the weekend? I personally plan on getting some sleep. And, no, don't think I get to actually sleep in on the weekends (a little maybe). There is always a little voice yelling, "Mamma!!! Mamma!!!" wanting me to come get her out of her crib. Or, "Mom I'm hungry, can you get me some cereal?" when they know perfectly well how to get themselves some freaking cereal. And really, how come DADDY never gets asked to get the cereal? I am sure he makes like the most amazing bowl of cereal ever! He probably even throws in some extra marshmallows in there....I'm just sayin'.
I have been playing around with Spring décor this week and thought I would show you the dining room tablescape I created for Spring. And guess what? More ferns! I think they are officially my theme for this Spring. That and bunnies. But that's mostly because of Easter and because bunnies are the freakin' cute. Have you seen the new Peter Rabbit movie? I was dying with laughter at the music choices and how adorable the bunnies were. Like uncontrollable laughter.


There's my ferns! This centerpiece is so tall, that I wouldn't keep it here if we had guests over and we were eating in here, but it is such a fun statement piece. And really dining rooms are for the fancy stuff. And homework too.....Does your family do that too? Use the dining room for guests and homework? We have such a small table in our kitchen that if we have even one more person over we usually end up eating in here and we have the kids eat in the kitchen. I love that it makes the room look so grand with the chandelier and demijohn together.


I didn't get a the greatest picture of them, but even my napkin rings are ferns! They were a gift from my husband for our last anniversary, which I think was year of bronze. I love them so much.


I kept it pretty simple in here like I did in the entry and just used worked with the basic neutrals in the room and added a little bit of greenery here and there.


I picked up these faux antique chocolate bunny molds at Michaels and I am so in love with them! They look just like the real thing. I love when you can just find a remake of an antique (that is well made of course) instead of having to search all over the place for it. I love to go antique-ing, but it is really hard to find the time for it. And the biggest antique store near to me recently closed down, so I am on the hunt for the next best place to find treasures. Anyone know of anything close to Snoqualmie that has tons of good stuff?

Hope you are all off to a good start to your day. My girls don't have school tomorrow so I am looking forward to at least the attempt to sleep in and some quality time with them.

Wednesday, March 14, 2018

Spring Entryway

Spring is in the air! Can you feel it? I swear two weeks ago I was just itching for it to snow again and I was completely content with the daily rain. I never really have a problem with the rain here in Seattle. It might have something to do with me being a homebody, but I love the rain. It's so cozy. As long as I don't have to be out running errands in it, I'm really fine to just curl up at home and listen to it pour. But after a weekend trip to Santa Barbara with my hubby and just getting that little taste of the sunshine and warmer weather, it made me so excited for Spring! I have been spying little teeny tiny buds of green starting to sprout here and there outside, so it really is coming! I promise! I switched up our entry a little bit and gave it a little Spring refresh and I thought I would show you how it looks.


The girls and I were at Target recently and we spotted this cute black and white pillow. I was thinking hard about it, but before I could say anything, Scarlett said we needed it. So naturally, I listened to her.


I also added these cream rugs from World Market and I love how they cozy up the space. Only our kitchen and entry have hardwoods, but I sorta wish (ok, I REALLY wish) that our whole house had hardwoods so that I could have some fun with rugs. They really add something to a space and I feel like rugs are not something that people think about a lot.


I got this side table from Amazon after I spotted a similar one on Liz Marie Blog. I love how this space that was basically just an odd wall is becoming a fun, cozy spot that we can use on a daily basis.


There is a Hearth and Hand wreath just like this fern one I made here. I just have such a hard time spending money on décor when I know I can make it for cheaper. The supplies to make it ended up being about half the price of the ready made one. Even if you're not crafty at all, this was super easy to make. I just got one of those grapevine wreaths from Michaels and some faux fern sprigs and stuck the sprigs straight into the wreath. That's really it. I didn't even glue them in, which is great because then I can re-use the grapevine wreath when I feel the need to switch it up.


All this space really needed was a little bit of greenery to make it feel like Spring. I am really into ferns right now. I have been using real and faux ones all over lately; they are just such a unique looking plant. And so far, I have managed to keep the real ones alive!


Then if you look up from this spot, you can see the new "farmhouse" sign I picked up on my first trip to our NEW Hobby Lobby in Issaquah. That store is so amazing; I don't know how I lived without it this long. We may not really live in a farmhouse (we actually live in Suburbia) but a girl can dream! And I love this little spot for it. It's like it was meant to be there.


I hope you enjoyed this little mini tour of our Spring Entry and I hope you have a perfect day!

Tuesday, March 13, 2018

Toddler Girl Spring Capsule

Hi everyone!
Is anyone else suffering from Daylight Savings happening? Usually it only messes with our kid's schedules (and moods), but for whatever reason, I have been struggling this week. I'm SO tired! And coffee just doesn't cut it! Then all of the sudden it's dinner time and I'm like, "Wait! It's still light out!?". Anyway, I am really excited for this post today because it is something different for me and I hope you will really enjoy it and maybe even find it useful.

I love the idea of capsules because:
A. They simplify your wardrobe and force you to use things that you have.
B. It shows you how to put outfits together and seeing it all laid out shows you that you actually DO have something to wear.
C. It cuts down on laundry. (Hey anything to help with that right?)
D. Everything goes together and you can mix and match.

I have three daughters and I do my best to pass down their clothes and re-use them for the next child, but I have found that it often happens that once my second daughter gets through with them, they are so trashed, I have to buy new clothes. I like that a capsule consolidates what you really need so that I am not buying a ton of extra stuff that in the end will not get much use. So, while I am by no means a strict "capsule-er" I like to use the idea for those reasons. This Spring capsule wardrobe for toddler girls was really fun to create and I hope you enjoy! Most of the items that I listed are from Old Navy and Gap; both of which are having a big 40% off sale today, so if you want to buy anything you see, hurry and grab it today!


To create this capsule, I tried to keep with the same color palette, so that everything will go together nicely and so that it will be easy to throw in fun, pretty pieces like florals and pinks. I really love the soft pinks that are in for Spring and I especially loved creating this for my 2 year old, because it is basically the same color scheme I used when I was putting together a layette for her. It just seemed fitting that these were the colors I chose, because they are "her" colors.

Pieces in this capsule:
Coats: Military green jacket, cream cardigan and denim jacket. Neutral colors that go with everything.

Long Sleeved Shirts: 5 different tops in varying colors that all stay in the same color palette.

Short Sleeved Shirts: 5 different tops in varying colors that are all in the same color palette.

Pants: Military green pants (I love this color and I am always shocked by how much they go with), basic denim jeans, soft blue gingham skinnies, soft joggers (for cozy days/playdates) and white skinnies (a perfect color for Spring).

Short bottoms: Cream skirt, green shorts (again, they go with everything) and denim shorts. I didn't choose too many short pieces because Spring can still be pretty cold here in the Northwest.

Dresses: Soft pink dress (this color is very trendy this Spring), striped dress (Its always good to have a few striped pieces, they are so versatile!) and a chambray romper (I always go a little overboard with chambray, it's just such a great neutral!).

Shoes: Brown Mary Janes, Neutral tennis shoes/ sneakers, brown booties, rain boots (because April showers!)

Accessories: Sunnies, headband, bows. Not essential, just fun!

You can shop all the pieces I put together by clicking on the links below:

Green Jacket 1. Cream Sweater 2. Denim Jacket 3. Sunnies 4. Headband 5. Bow 6. Chambray Long Sleeved 7. Light pink Long Sleeved 8. Ivory Long Sleeved (Sold Out, so I linked a similar one) 9.
Pink Ruffle Sweatshirt 10. Gray Long Sleeved (Sold Out, so I linked a similar one) 11. Ivory Short Sleeved 12. Floral Sleeveless 13. Chambray Short Sleeved 14. Polka Dot Blue Short Sleeved 15.
Light Blue Striped Short Sleeved 16. Green Pants (Not as good as the ones I have pictured, but an option) 17. Basic Jeans 18. Gingham Pants 19. Striped Joggers 20. White Jeans 21. Cream Skirt 22.
Green Shorts 23. Denim Shorts 24. Brown Boots 25. Rain Boots (Another style, same brand) 26.
Sneakers 27. Mary Janes 28. Pink Dress 29. Striped Dress 30. Romper 31. 

I decided that I will also post pictures on Instagram of my little 2 year old, Everly, whenever I dress her in pieces from the Spring capsule so that you can see the outfits put together. I thought it could be a fun way to keep this going. So follow me on Instagram and stay tuned. I will use the hashtags #toddlergirlspringcapsule and #everlygrayson so you can always search those tags as well to see anything that I've posted. Have a great rest of your day!


Monday, March 12, 2018

Subway Tile For The Kitchen

Happy Monday Friends!
It is a beautiful sunny Spring day here in Snoqualmie and I thought I would take advantage and show you the new subway tile we recently had installed in our kitchen. My husband and I painted the cabinets over Thanksgiving break and that made such a big difference to begin with, but adding the tile made it so much better! It's like a brand new kitchen and it feels so nice to have it feel like "ours". I love how clean and airy it makes the kitchen feel. The first week we had it, I kept thinking "Wow, the kitchen looks clean even when there are dishes all over the counter! This is amazing!". It's such a pretty backdrop and I love that it's so practical too. If anything splashes on it, it's easy to wipe down. The grout color is not quite as dark as I wanted it and I'm a little nervous about it getting dirty over time, but so far if anything gets in there, we have been able to clean it with soap and water.
This transformation was so exciting to see! Here it is.


It's been so fun decorating in the kitchen with the new tile as the backdrop. It just makes everything else pop.


I've been slowly pulling out my bunnies and Easter decorations. I love bunnies and Springtime décor.


There you have it. If you want to see more photos of the kitchen and how it looked like before the tile and the painted cabinets you can read this post I did on it. It's crazy to see how much it changed with just those two updates.
Hope you're enjoying a sunny day!

Friday, March 9, 2018

Kitchen Nook Wall


I found this idea in Better Home and Gardens magazine and as soon as I saw it, I knew exactly where I wanted to re-create it. Between our kitchen and dining room is our pantry which is tucked underneath the stairs. The entry between the two rooms is kind of a bare wall that really nothing could be done with. It always kind of bothered me, as I want every space in our home to be utilized to the fullest. I would hang holiday banners there or our large advent calendar, but most of the year, the wall remained empty and it kind of made this spot feel like a tunnel. So I was really excited when I saw this idea, because I thought it would create such a fun space here. I'm not really sure what I should call this project, Kitchen Nook I guess? It's not really a command station, but it has storage and paper to write notes and lists on. Anyway, I'll call it that and you'll see for yourself what it is.
Here is how we re-created it.


We (and you know when I say, "we" I usually mean my husband, right?) put in this large kraft paper roll. I think it is so fun. We use it mainly for writing our shopping and grocery lists in one place, but we also write notes to each other, the girls can clip their art on it and I like to put up cute sayings for the different seasons and holidays. My dad liked that during the Christmas season we kept a naughty and nice list going. He made sure to check it every time he was over and give warnings to whomever wasn't doing so good.


Then we hung these wooden bins to store cookbooks and I put onions and potatoes in the lower two. I like being able to have a separate spot for each that is hidden away. Did you know that you are supposed to store onions and potatoes separately? Did you know that you're not supposed to store them in the fridge? Did you know that potatoes should be kept in the dark? Did you know that when left long enough, potatoes will actually start sprouting leaves!? Just kidding, me neither.


Every Christmas my family (and their spouses) picks a Secret Santa to gift to and he was super sneaky about it, but my husband had me! He gave me this beautiful glass bottle hanging piece. I just have faux greenery in there now, but I am excited to switch it up throughout the year with different flowers.

I really liked the idea of having an herb wall as part of this, like in the original picture, but I knew that it would never be able to work, because there is not nearly enough sunlight here. Plus, my thumbs are not the greenest and I didn't want something so permanent that I couldn't keep up with. So we just simplified it a little to better suit us.


There's a little peak of our recently painted and tiled kitchen. I will do a full post on it soon, I am just sort of waiting for a bright sunny day to do it justice!


I would like to add some hooks like they had in the original inspiration picture as well. We have quite the collection of cute little aprons for the girls and I would love to display them, but I am looking for a very specific farmhouse style and of course it has to be just the right size as well. There are always those things you just gotta wait for right? Happy weekend friends!

SOURCES:
Large Kraft Paper Roll- Amazon
Hanging flower vases- Local hardware store
Wooden bins- Micheals (They had words printed on the front, I think they said, "Farm Fresh" which was cute, but we turned them around towards the wall for a cleaner look)

Thursday, March 8, 2018

Sideboard for the Dining Room

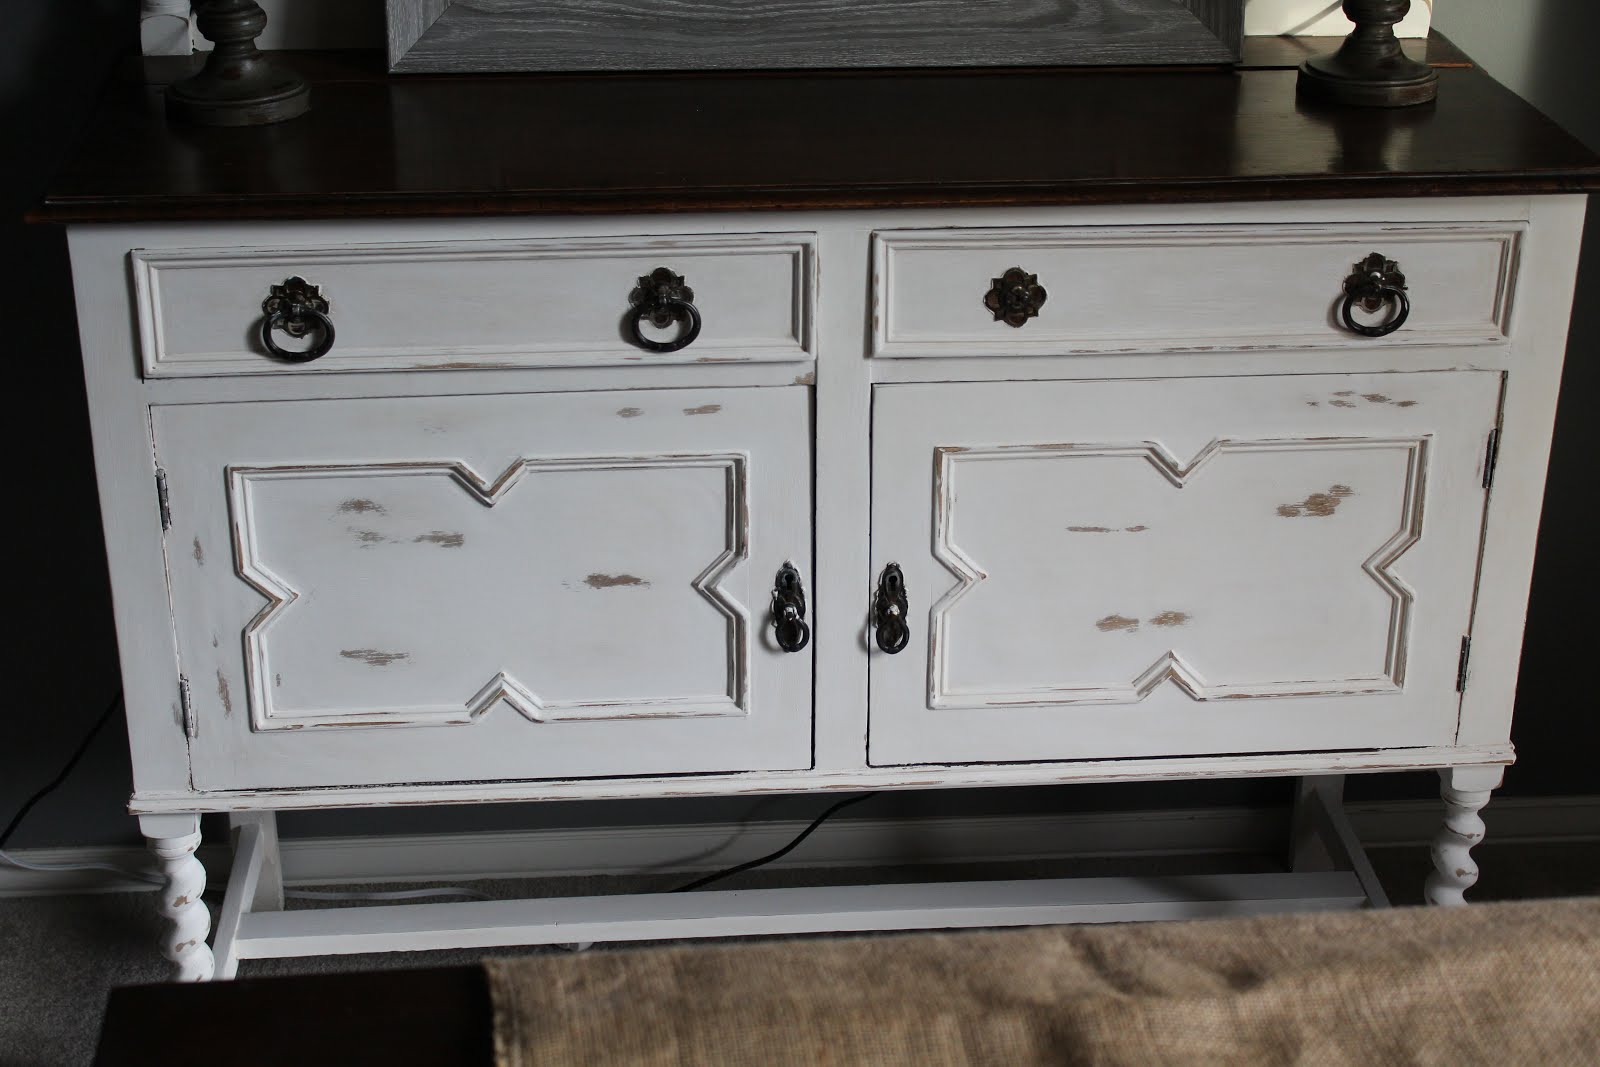
Finally I am posting our finished sideboard! I started this project back before Thanksgiving and showed some of the process of painting and sanding it on Instagram stories. I know I was freaking some of you out with my methods....sanding it in the house, painting over the carpet...What can I say? I am impatient! When I get an idea for a project in my head, I want it done and I want it done now! Who has time to sand? Who has time to lay a tarp down? Not me. I had a hard enough time convincing myself to take all of the china out. I bought this sideboard from a lady who listed it on craigslist and she had this thing so well oiled that it took forever to sand it down enough. The first few times I painted it, the oils would seep through the white paint and make it look all yellow-y. So it was a little frustrating to say the least. Then the holidays came and I kept putting off finishing it because I was freaking out about it turning out the way that I wanted it. I finally just stuck it out for a few days and got it done. There was a lot of sanding. A lot of sanding. It takes forever! And yes, we finally did take it outside to the garage to sand it. We started seeing dust all over the house....whoops. Oh well, it's good for the lungs right? Anyway, all that's behind us now and it's done! And I love it so much. I knew from the beginning that I wanted to paint it white. The color that is was before was beautiful, but with our dark dining room table already in the room it really needed to be lighter so that the whole room wasn't just dark. I took a poll on Insta-stories and was convinced to at least keep the top of the piece brown, but I painted the rest white and then sanded it down again for a more distressed, chippy look. There is a mirror on the top part that I thought about painting with chalkboard paint so that I could write cute little notes and sayings, but I decided to leave it (at least for now), since I planned on putting a large mirror in front of it.
Here are the before and afters!

BEFORE:


AFTER:


It really made a difference in lighting up the darkness of the room. I love the dark color on the walls we have in here, but the sideboard just brings a bit of brightness in here that it needed.


It is so nice to have the extra storage that this piece gives. I was able to put all of our fine china in here, all of our cloth napkins and a ton of wine. We have started to have quite the collection of wine and there's nowhere to put it! Time to put in a wine cellar. ;) No matter how big your house is, I feel like any time you get a bit of extra storage its so exciting. Maybe that's just me. Maybe I'm weird. But storage is exciting! Having things organized and in their rightful place is exciting! CONTROL! Haha. Pushing up my nerd glasses now.


The first time I painted and sanded it down, it looked so cool with just a little bit of the white paint showing and the raw wood. I definitely thought for a second about keeping it that way, but in the end I knew it had to be more white to lighten up the room. But I'm definitely keeping that idea in mind for future pieces. It was very cool looking.

Another new thing in this room are these new dining chairs from World Market! I have been lusting after these chairs for quite a few years now and I finally caught a sale big enough to justify getting them. I'm in love. They are so pretty and have that vintage, French farmhouse look I love.
Did you spot Asher? He loves to watch me (or really just be "nosy") whenever I am decorating or taking pictures. He's a pretty cute model though, so I don't mind.


The only other thing we need for this room now is two end chairs. I want them to be taller upholstered or slipcovered white chairs and I am on the lookout for the perfect ones. They also have to be sort of shallow so that they will fit in the room. We wanted the table to be large enough so that it would accommodate all our family and friends, but the room itself is on the smaller side so the table overtakes the room and doesn't leave much space for chairs. But I am sure I will find something perfect. Sometimes all you have to do is be patient until you find the perfect piece for a space.

Hope you are all having a great week! You can find a source list below and as always leave me a comment below if you have questions or just want to say hi!

SOURCES:
Dining Table- My husband made it with plans from Ana White. She has plans for many different styles of tables.
Dining Chairs- World Market
Sideboard- Craigslist
Paint used for Sideboard- Martha Stewart's Wedding Cake Chalk Paint
Mirror- Home Goods
Lamps- Wayfair
Chandelier- Circa Lighting