Wednesday, April 23, 2014

Lemon Cream

Lemon Curd. I know, I know. It sounds disgusting. "Curd" has got to be one of the nastiest sounding words in the English language. I mean really, why couldn't they have called it Lemon Cream? That sounds luscious....That's it, I'm changing this title to Lemon Cream. But I'm telling you. Get past the name, because this stuff is dreamy. Growing up my mom always had this stuff in the refrigerator. I never knew why, because the name was so horrifying to me. But now that I've grown up and my taste buds have matured, I've learned that sometimes its a good idea to give things a second try. And I'm so glad because this stuff is delicious and really fun to make.

There are quite a few recipes out there to try and honestly I only used this one because I only had 4 eggs. Easter wiped us out! But its pretty good one from Ina. Here it is. And in case you were wondering....1/4 lb of butter is one stick of butter. I don't know why she just couldn't say that. Geez Ina! Anyway, this recipe will keep for 2 weeks in the fridge.

Here is how mine turned out.


If you are wondering what the heck you do with this yumminess, (besides lick it off the spoon) allow me to count the ways....
*You can use it to make a lemon tart
*You can use it as the filling for French Macrons
* You can make a batch of meringues (pipe into little nests) and spoon some of the lemon curd on top for a quick and impressive dinner party dessert (all parts can be made ahead of time). Top with fresh blueberries if desired. A beautiful light and fresh Springtime dessert!
* You can spread it on toast (which was what I did this morning...it was so good...spread some butter on there too, oh yeah)
* Spread it on leftover girl scout shortbread cookies or homemade sugar cookies
* Put it in your oatmeal.

The options are endless my friends. And for whatever reason, I feel like Lemon Curd pairs well with a nice cup of tea. Not in the tea of course, but maybe on a piece of vanilla pound cake. Yummy!
Speaking of tea, I recently discovered this really fun blog dedicated to tea. That's right, just tea. Thirstyfortea.com. I swear, I spent like an hour browsing her blog the other evening. Check out her most recent post on Easter Bunny Stroopwafels. So freaking adorable. I'd never heard of a stroopwafel before, but after seeing what she did with it, it make me a lover.

That's it for today. Any naysayers still out there? Just try it. It's SO GOOD!

Saturday, April 19, 2014

Natural Egg Dye

I have been wanting to try and dye my Easter eggs with natural dyes for a few years now. And every year I chicken out and get the $2 PAAS pack. Nothing wrong with that. I just think its so cool that you can make your own dye using natural ingredients. I decided this was the year. I looked up how to do it and found good old Martha was the one who had the best recipe. She made it pretty simple and once you have the basic recipe down, you can experiment with pretty much anything. I wasn't sure how this one was gonna work out. So I did buy a backup plan PAAS pack, just in case. Although it was time consuming, it was really cool to see the colors come out of all the random things. Red cabbage? Tumeric? Weird! But cool too!

Here is the how to.

You will need:
Wide mouth jars or bowls
Large pot
Cheesecloth
Vinegar

In a large pot boil 1 quart of water with 2 tablespoons of white vinegar. Add any of the following for your different color choices.

4 Cups of chopped red cabbage= Blue
4 Cups onion skins (Seriously, who would have ever thought you could use these things?)= Sienna
3 Cups blackberries or blueberries= Pink (*NOTE this one did not work!)
3 Tablespoons of Tumeric= Yellow
4 Tablespoons of coffee beans or grounds =Brown

* Make sure that your ingredients are completely covered with water. If you need to add another quart of water, that's fine, just be sure to add another 2 Tablespoons of vinegar.

* Once the ingredients are boiling, lower to a simmer and simmer 1/2 hour. Allow to cool then strain out the dyeing agents. It helps to strain it through cheesecloth as there is a lot of sediment in the coffee and tumeric ones especially. Then its ready for dyeing! Be aware that this dye may need the eggs to sit longer than traditional dye, so leaving some in the jar with the dye in the fridge overnight is a good idea. Just pop em in the fridge then see what cool colors you get the next morning!

From left to right: Red Cabbage, Tumeric, Coffee, Onion Skins, Blackberry/Blueberry combo.


Here is what my eggs looked like the next day.
The Blue one is from the red cabbage, the orange-y one is from the onion skins, the yellow one is from the tumeric and the brown one is from the coffee. Pretty cool huh! My blueberry/blackberry concoction didn't work out. Not sure what went wrong with that. The egg came out and had a gross grey film on it. Yuck. I'm pretty excited that my other ones turned out though! Now I want to see what other colors can be made. I wanted to try beets, but the grocery store was all out. I'm assuming they would have made a cool pink color.


One thing about dyeing them this way is that its definitely not kid friendly. It just takes too long for a little one's patience. The great thing about the PAAS dye is that it dyes the eggs almost instantly. Yes, I used the backup plan. As Princess sat there staring at the jars full of dye, eyes full of excitement and anticipation I realized we would need a much quicker version for this to be fun for her. Oh well. It was fun for me!

Happy Easter everyone!!!

Friday, April 18, 2014

Plastic Egg Garland

Easter is just around the corner! If you are looking for a quick, easy and cheap last minute decoration for Easter, you have come to the right place. This one costs $2! Or its free if you have tons of extra plastic eggs laying around the house. Which most of you probably do. And its a great activity for little ones. Princess liked picking which color I should put on next. And if she had it her way, the entire thing would have been pink. Luckily, I did some editing.

You will need:
A bag of plastic eggs (Just make sure they are the ones that have 2 holes in the top. Most do)
Baker's twine
A toothpick
Scotch tape
Scissors

Step 1: String the eggs through the baker's twine through the two holes on one end of the egg. When I realized there was holes in them I was like, "Whhhaaaa?!" (almost like they were MADE for this project). Continue with the rest of the eggs in a pattern making it to desired length. If you are wondering about the toothpick, here's what its for. Some of the eggs holes were a little blocked up with plastic. They were $2 after all. So just poke the toothpick in there to clear it out so that you can get your twine through.

Step 2: Tape up with scotch tape in location of choice. It won't be very heavy, so scotch tape is all you will need.


And DONE! Told you it was easy! And so fun! Happy decorating!

Thursday, April 17, 2014

Peter Rabbit Birthday Party

My sweet little baby turned 2 last weekend. I can't believe my baby is 2! Time flies by way too fast. I hate that her baby days are soon to come to an end. Just stay my little Peanut forever! She is the sweetest little thing. Always getting shoved around by her big sister and always taking it with a smile. Every morning she wakes up so happy and gives me the tightest hugs. I love her! I wish I was that happy to wake up in the morning. She is my little artist. I think she would color all day if I let her. And she colors in the lines! She is going to be really good at drawing like her Daddy, I know. I had so much fun planning this party for her and all the preparing and planning was so worth it. It was a beautiful party (if I say so myself) and a gorgeous day for it. The theme was Peter Rabbit. My sister had told me about these people who rent out LIVE bunnies for birthday parties and I knew at once that I had to figure out a way to get those bunnies! What could be more perfect than a Peter Rabbit theme? Peanut has gotten a lot of Peter Rabbit books and toys in the past so its kinda become her thing. Since this is probably the last year I can pick what she does for her birthday, I decided to take advantage and get those fluffy bunnies. Here are pictures of the event.

The Invites:

So I found these adorable Peter Rabbit invites on Etsy that were way too expensive. "Lettuce" leaf wraps and a "carrot" tie around each one. Freaking adorable. But there was no way I was gonna pay that much for the invitations for my 2 year old's birthday. But I thought, you know what? I really want these! So I got a much simpler invite and then made the "lettuce" leaf wraps and paper carrots myself. I made the wraps by painting simple white doilies with green watercolor paints, then I cut out the carrots from card stock and tied them on with baker's twine.
They ended up looking so sweet!


The Decor:
I purchased this little chalkboard sign last year for Peanut's birthday and it has been really fun to have throughout the year to put cute little sayings on it for holidays and such.

The birthday girl chair. She is getting too big for it, but she is still such a messy eater!

For whatever reason the first set of hydrangeas that I bought died within a day (maybe what I get for trying to be cheap and get them at Costco), so consequently I was rushing to go get fresh ones right before the party. And it turns out bunny balloons are really hard to find. You'd think it would be easier with it being Easter time. Oh the trials of being slightly OCD.

This little birdcage was a perfect addition to the decor. Then I just printed out a few different pictures of Peter Rabbit and put them in simple white frames then spread them throughout the party. It really added something special. I definitely will be using that idea for future parties. I pulled out all of the Peter Rabbit books we had a set them out, just in case someone had a spare minute to catch up on their reading.

The favor bag table. It worked out so perfectly that Easter is just around the corner. That way all the Easter bunny decorations fit right into the birthday party theme!


I made a chalkboard "stats" sign for Peanut. Got this new chalkboard from World Market a few weeks ago and I am loving it. I can't get enough of those chalkboard signs!


No party store in a 50 mile radius carried Peter Rabbit party items. Thank goodness for Amazon!

For the food we had turkey and swiss bunny shaped sandwiches for the kids. Brie, prosciutto and apple sandwiches with sage butter. So delicious! BLT sandwiches, Peter Rabbit squeezy packs (Only Starbucks sells them), Veggies with homemade ranch dip, bunny shaped sugar cookies with almond icing, and blackberries (because that's what good little bunnies eat).
 
This lil bunny is actually a Classic Winnie the Pooh, Rabbit. Looks just like Peter Rabbit to me!
The cute little terra cotta pots I got from Micheal's and they were just the thing to make you feel like you were in Mr. McGregor's garden.

The homemade ranch I made is actually a Paleo recipe. You would never know, because its so addicting!


The Entertainment:
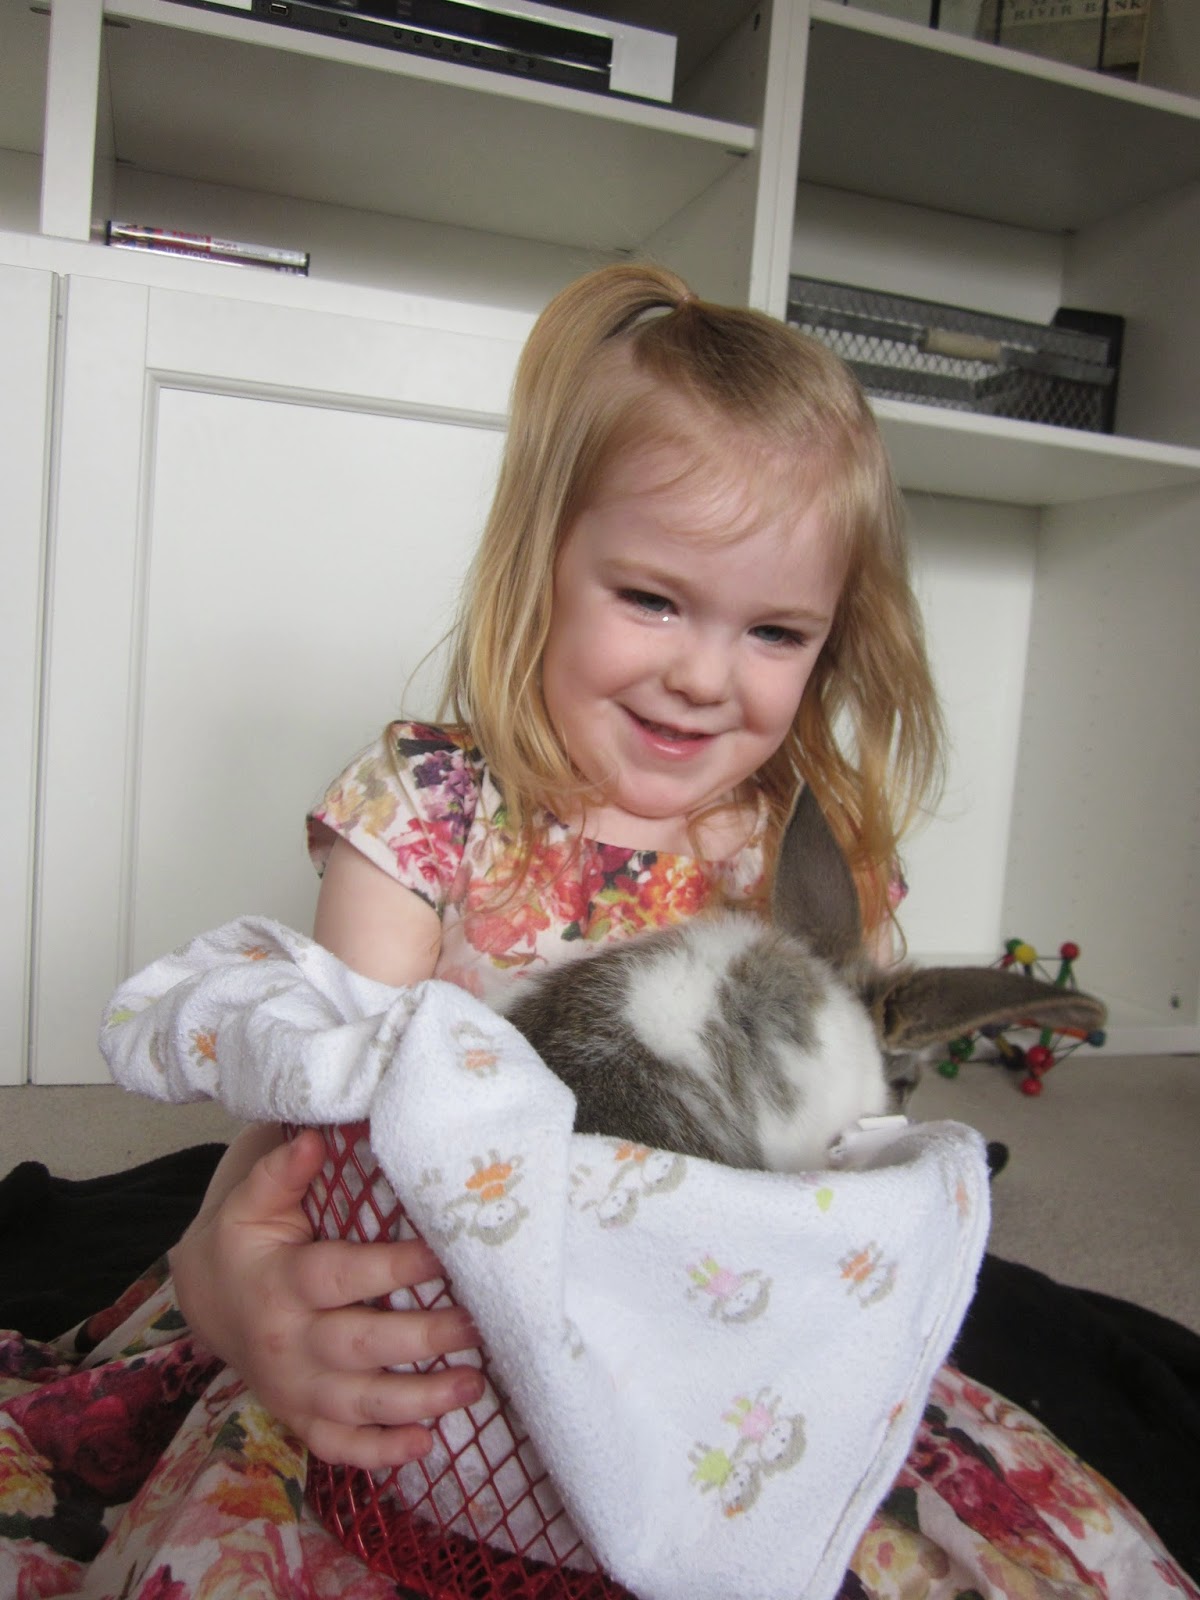
So the bunny lady arrived 20 minutes after the party started and brought in two large Tupperware tubs full of bunnies. It was amazing. She opened the lid and all the kids squealed for joy at the sight of all those sweet bunnies snuggled together. Then we sat out on a blanket of the floor and everyone got to hold and snuggle the bunnies. I don't know if anyone was quite as excited as I was, but everyone loved it. We got the kids to hold still and play with the bunnies for a good 20 mins. The whole scene was just precious.


Seriously. This one looks exactly like the Velveteen Rabbit. And OMG it was the softest thing you will ever touch. It was like petting air!


Little miss Princess could barely contain herself. It was one bunny to the next with her. And she loved putting them into the baskets and holding them.


So fluffy I'm gonna die!!!

This one fell asleep on my lap! WAAAHHH! It's name was Banana. Kill me now. Too much cuteness!

The Cake:
I don't know why, but frosting this cake was a big issue. It fell apart as soon as the frosting touched it. Probably because I was being lazy and made a box cake. SHH! Don't tell. Anyway, that's why its a little slanted on one side.


She wasn't really sure what to do when the cake got to her. Mommy and big sister had to help her blow out the candles.

The Favors:


Since Peanut loves to color, I thought it was only fitting that we include some coloring pages for her friends.

These are handmade Peter Rabbit lollipops that I bought off Etsy. They were like cotton candy flavored or something. I snuck a mommy tax from Princess. It was delicious.

I got the little buttons on Amazon.

I made these little stuffed carrots. Perfect thing for decorating for Easter or for adding to your little one's kitchen set collection!

It turned out to be a pretty successful party! Happy 2nd Birthday my beautiful lil Peanut. I love you SO MUCH!

And look! We even got a picture all together! Which is a big deal because we forgot to on Peanut's 1st birthday.
Birthday girl doesn't look so happy there. Maybe just distracted by all her new toys.

That's it for our Peter Rabbit Birthday Party. Now if only we can convince Daddy to let us get some pet bunnies....Then life would be complete.