Halloween is getting close! A little under two weeks away! My girls are getting SO excited. "Halloween is coming next." Princess says. I just thought I would stop by and show you the very last finishing touches of Halloween decoration that we put up this year.
On the front porch I got some spiderwebs up. I always hate putting them up, so I always put it off until the last minute. But I feel like you have to have spiderwebs for Halloween! My little photobomber decided to make an appearance as well. Then I put the flowers on the right on top of a crate I got from Michaels and then stained. I just thought they got a little lost back there behind the pumpkins, so I got them a little height to add some dimension.
It's almost time to carve those bad boys! I have no idea what I want to do on mine yet.
Then I made up some pillows for the front bench. I had the perfect fabric that my mother-in-law had given me awhile back so it was perfect, all I had to get was zippers and pillow inserts. Lola (our photobomber cat) has been quite enjoying snuggling on them.
I picked up a little "witches" broom to put next to the front door. Princess keeps wanting to take it off to play with. Even though she has her very own mini broom!
More spiderwebs inside. The gross thing is that those fake spiders are actually the size of real spiders we have been seeing lately! So sick.
Then I got a large spider to hang off our mirror. I just thought the mantle area needed a little something more. Even though I tried to pick the cutest spider I could find, I still shiver sometime when I see that thing. Yikes!
Monday, October 20, 2014
Thursday, October 16, 2014
A Sign for the Kitchen
Ever flip through a magazine and keep saying, "Oh, I could totally make that!"? One of the magazines I love to flip through the most is Pottery Barn. Just give me a Pottery Barn home PLEASE! Every page is decoration perfection! Oh, all those vases of flowers? So totally there every day. That table setting? Yeah, my table looks like that every night. Insert hair flip here. Those picturesque freshly picked vegetables in the corner of the kitchen island? I'm gonna make a French Ratatouille with them. No big deal. No, but seriously, who doesn't want their home to resemble all that rustic goodness? Well, Pottery Barn is gonna be PISSED when they see this! JK. No, but really. I always go through every (no exaggeration....every) PB magazine that comes through our home to find things that could easily become diy projects. You know, those cutesy things they sell that are like $100 and you know they aren't actually worth that much? Well this is one of those times that I was like yeah, that's cute, but instead of shelling out 100 for it, I'm gonna make my own version.....for like 10. I've always wanted an "eat" sign in our kitchen. I mean not like we need any encouragement around here, but still. I saw this one from PB and thought I would make a similar version. Here it is.
You will need:
A board (the size depends on where you are putting it, how big you want it, etc. Mine was 24X17.5)
Stain (I used my good old American Walnut. Since now we have so much of it!)
White chalk paint (or regular white craft paint)
Sandpaper
E, A, T Letters
Black craft paint
Wood glue
Step 1. Stain the board. I only did one side, as we won't ever be seeing the back side of it.
Allow to dry.
Step 2. Once the stain is dry, paint 1 or 2 coats of white paint over the stain (I know, I know, it seems silly, but you'll see why). You want enough to cover it, but not completely, as the end result of the sign is supposed to look "rustic".
This is the white paint I used.
I did 2 coats. Allow the white paint to dry completely between coats.
Step 3. Paint your E, A, T letters black (if they aren't black already). You can find letters at the craft store that are black, white and plain wood. So really, just look for the font and size you like, because you can paint them from there.
My white letters needed 2 coats of paint.
Step 4. Sand your white board only in a few places, to give it a worn, rustic, old board look.
Step 5. Glue the E, A, T letters onto the board with wood glue. And remember that a little goes a long way.
Allow to dry.
Then you're finished!
I had the perfect place to just lean my sign up above my cabinets, but if you would rather hang your sign on the wall of your kitchen just get one of those "sawtooth" picture hanging hooks and attach it to the sign, then hang it with a nail. Easy peasy. Lemon, squeezy.
And here is 80 more pictures to show you how happy I am with my new sign.
I mean really! How often can I show off my kitchen when it's actually clean?
We actually have a matching spoon to the fork that's over there, but it keeps falling down! So we are waiting on the hubby to come up with an ingenious way to keep it up there. Velcro was a no-go.
Trying to get a good shot of the chalkboard sign and the eat sign together.
You will need:
A board (the size depends on where you are putting it, how big you want it, etc. Mine was 24X17.5)
Stain (I used my good old American Walnut. Since now we have so much of it!)
White chalk paint (or regular white craft paint)
Sandpaper
E, A, T Letters
Black craft paint
Wood glue
Step 1. Stain the board. I only did one side, as we won't ever be seeing the back side of it.
Allow to dry.
Step 2. Once the stain is dry, paint 1 or 2 coats of white paint over the stain (I know, I know, it seems silly, but you'll see why). You want enough to cover it, but not completely, as the end result of the sign is supposed to look "rustic".
This is the white paint I used.
I did 2 coats. Allow the white paint to dry completely between coats.
Step 3. Paint your E, A, T letters black (if they aren't black already). You can find letters at the craft store that are black, white and plain wood. So really, just look for the font and size you like, because you can paint them from there.
My white letters needed 2 coats of paint.
Step 4. Sand your white board only in a few places, to give it a worn, rustic, old board look.
Step 5. Glue the E, A, T letters onto the board with wood glue. And remember that a little goes a long way.
Allow to dry.
Then you're finished!
I had the perfect place to just lean my sign up above my cabinets, but if you would rather hang your sign on the wall of your kitchen just get one of those "sawtooth" picture hanging hooks and attach it to the sign, then hang it with a nail. Easy peasy. Lemon, squeezy.
And here is 80 more pictures to show you how happy I am with my new sign.
I mean really! How often can I show off my kitchen when it's actually clean?
We actually have a matching spoon to the fork that's over there, but it keeps falling down! So we are waiting on the hubby to come up with an ingenious way to keep it up there. Velcro was a no-go.
Trying to get a good shot of the chalkboard sign and the eat sign together.
That's all for today my loves! Hope you enjoyed and we'll see you tomorrow!
P.S. In case you are now hungry from all the subliminal messaging going on.....google "White trash panini". Then make it. You'll thank me later. Or go to Taco Bell. That works too.
Tuesday, October 14, 2014
Refinished Bench
I never thought I would be a person to say, "I refinished a piece of furniture". It just sounded WAY out of my league. And I was pretty sad about it, because people can change utter junk (like the ugliest pieces of crap ever) into the cutest pieces of furniture! Just take a look at Etsy and you'll see. But we went to the annual garage sale that our community has every Fall a few weeks ago and I found not one, but two black benches for $5. Not $5 each....$5 for both! I was so excited! I felt kind of guilty walking away. Like I was knowingly cheating them. Where do you ever find a deal like that? Not even on craigslist. (Actually, especially not on craigslist. People price their stuff so high these days, its like, don't you want to sell this? Ugh. Another story) Anyway, they weren't the color I was looking for and honestly I didn't even know what I was going to do with two of them, but I knew this was a golden opportunity that I couldn't miss. So my husband and I wedged the two benches in the back of our yukon XL (Oh yeah, that's right. #suburbanmomlife) and drove home while I wondered if I would be reselling the benches on craigslist the next day.
In the end, I decided to keep them both; one for the front porch (which you have probably seen in pictures of the front porch decorated for Halloween) and one for our entryway. I knew I had to at least try to refinish them in colors that I liked. So I did. Here is how my black bench went from an old, beat up and not my style bench, to the cutest, country-esque bench ever!
Disclaimer: Since this is my very first attempt at refinishing a piece of furniture and I may not have done it the right/best way, note that there may be better ways of doing this and my way might not be perfect. So if you are looking to refinish something for your first time, research!
BEFORE:
I had already started sanding before I took the real "befores", but I was too excited! You get the idea though.
Step 1. Sand the entire bench down. One thing that would have been smart was to wear a face mask, as it gets really dusty and you will be coughing and could possibly end up with black boogers. I know, gross right? I don't even want to know what it did to my lungs to breathe that in. But once I started, I wasn't stopping!
I'm sure that I should have sanded more than I did, but I got to anxious to start painting. So this is about as far as I went.
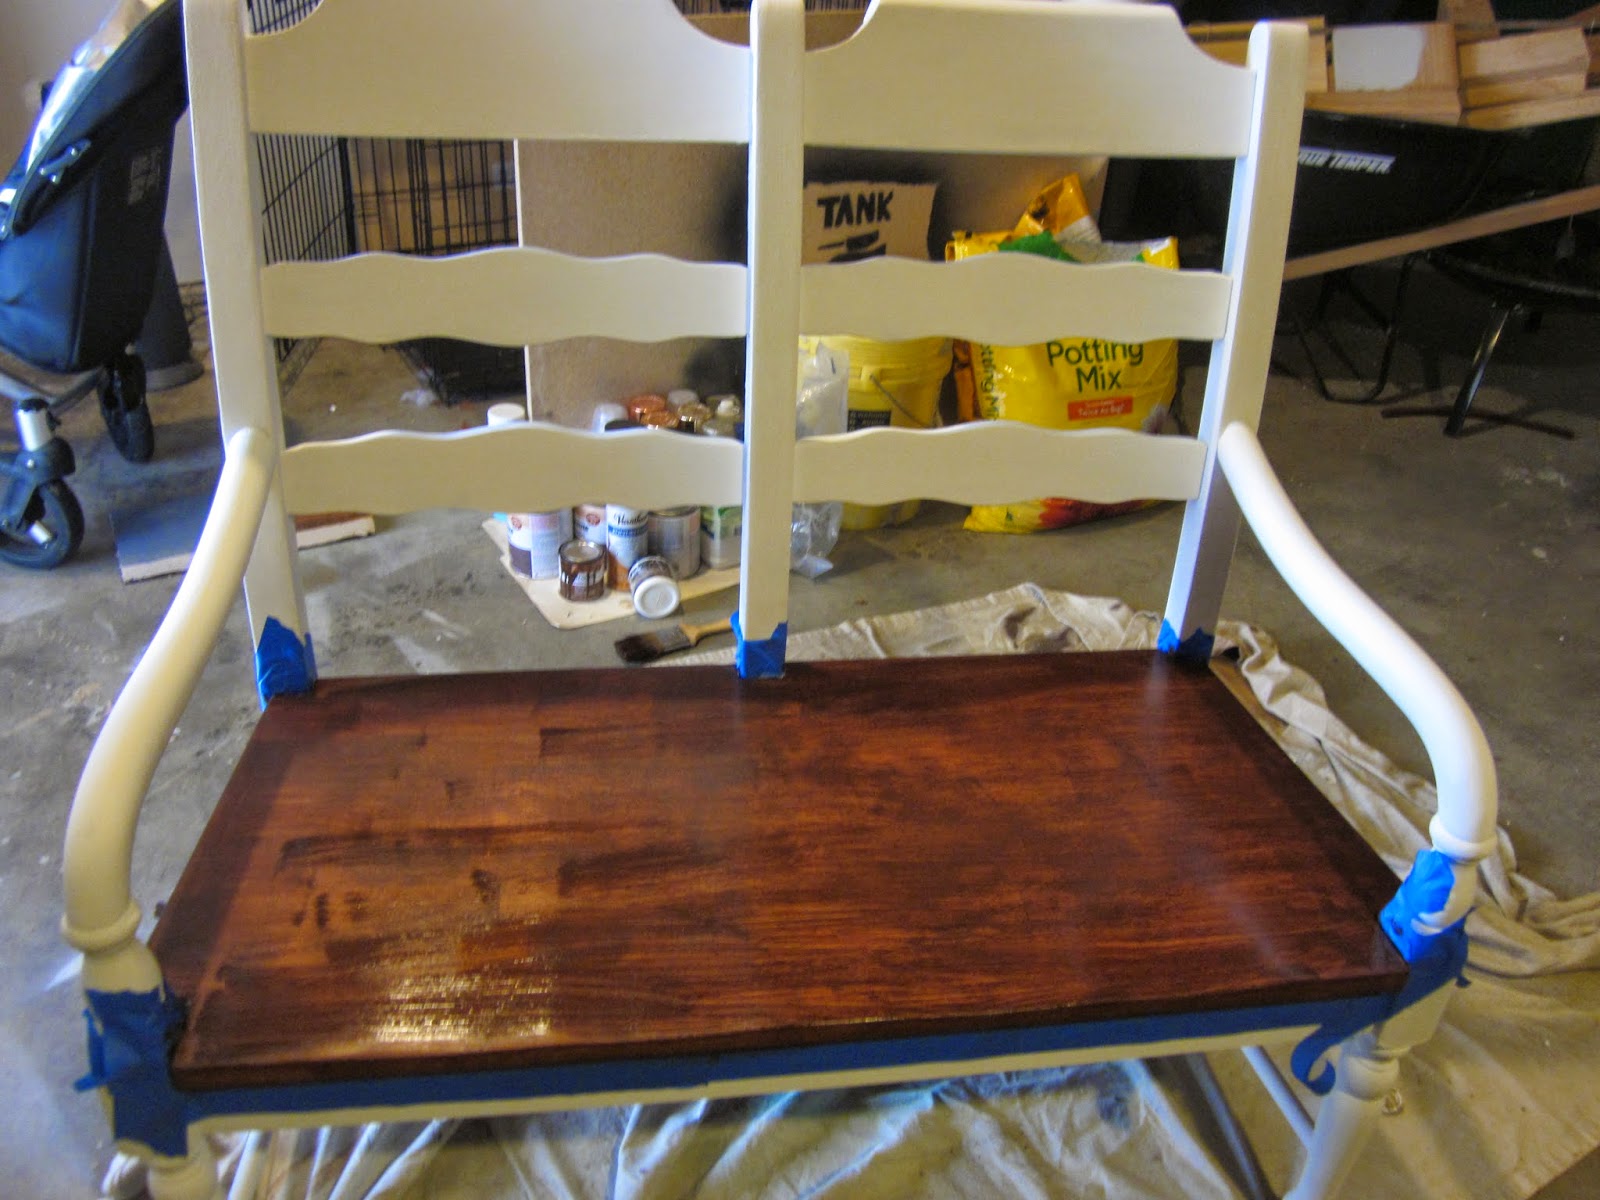
Step 2. Tape off any parts you don't want painted (I wanted the seat to stay brown) and start painting! I used a simple white chalk paint that you can find at Michaels. Note: Home Depot has LIMITED amounts of chalk paint and Lowes doesn't have any! So don't waste your time there.
It took me about two and a half coats of white paint, plus a couple times going over the whole thing with a tiny paint brush for touch-ups.
Step 3. Stain the seat of the bench. I used Rustoleum American Walnut (its seems to be the color I am using for many projects lately). I only used one coat, as a little goes a long way and I didn't want it to be too dark.
Step 4. Then spray two coats of polyurethane over the seat and then wax the whole bench, top to bottom. I used Martha Stewart's Vintage Decor Clear Wax. This is just to help seal it all in and protect the bench from getting scratched too easily. The chalk paint is nice because it gives it that cool "chalk-y" look, but then it can come off like chalk if you don't seal it with wax.
AFTER:
Cool right? I refinished a piece of furniture! All by myself!
Here it is in its new home. Right off the side of the entryway in front of the office. It felt a little strange at first to have it there, because it seems odd to have it right in front of the door to the office, but that side of the door is always closed, so it didn't really matter. I really like that it filled up the otherwise "dead" space and gave us a place to sit while getting shoes on. Peanut already has been sneaking off with her toys to sit and play on it.
I didn't want the seat to be quite so dark, but it has definitely grown on me.
That's it for today. Hope you've been inspired to refinish something of your own!
In the end, I decided to keep them both; one for the front porch (which you have probably seen in pictures of the front porch decorated for Halloween) and one for our entryway. I knew I had to at least try to refinish them in colors that I liked. So I did. Here is how my black bench went from an old, beat up and not my style bench, to the cutest, country-esque bench ever!
Disclaimer: Since this is my very first attempt at refinishing a piece of furniture and I may not have done it the right/best way, note that there may be better ways of doing this and my way might not be perfect. So if you are looking to refinish something for your first time, research!
BEFORE:
I had already started sanding before I took the real "befores", but I was too excited! You get the idea though.
I'm sure that I should have sanded more than I did, but I got to anxious to start painting. So this is about as far as I went.
Step 2. Tape off any parts you don't want painted (I wanted the seat to stay brown) and start painting! I used a simple white chalk paint that you can find at Michaels. Note: Home Depot has LIMITED amounts of chalk paint and Lowes doesn't have any! So don't waste your time there.
It took me about two and a half coats of white paint, plus a couple times going over the whole thing with a tiny paint brush for touch-ups.
Step 3. Stain the seat of the bench. I used Rustoleum American Walnut (its seems to be the color I am using for many projects lately). I only used one coat, as a little goes a long way and I didn't want it to be too dark.
Step 4. Then spray two coats of polyurethane over the seat and then wax the whole bench, top to bottom. I used Martha Stewart's Vintage Decor Clear Wax. This is just to help seal it all in and protect the bench from getting scratched too easily. The chalk paint is nice because it gives it that cool "chalk-y" look, but then it can come off like chalk if you don't seal it with wax.
AFTER:
Cool right? I refinished a piece of furniture! All by myself!
Here it is in its new home. Right off the side of the entryway in front of the office. It felt a little strange at first to have it there, because it seems odd to have it right in front of the door to the office, but that side of the door is always closed, so it didn't really matter. I really like that it filled up the otherwise "dead" space and gave us a place to sit while getting shoes on. Peanut already has been sneaking off with her toys to sit and play on it.
I didn't want the seat to be quite so dark, but it has definitely grown on me.
That's it for today. Hope you've been inspired to refinish something of your own!
Monday, October 13, 2014
Rustic Growth Chart
So there is this new blogger I have been following. Ok, maybe blog stalking is a more appropriate term. I think I originally found her on Pinterest and now I am so hooked. I literally went through all her blog posts from 2009 to 2014, day by day. I think my husband was getting a little concerned for me..... I am so addicted! She takes amazing photos, decorates her home perfectly, has creative and beautiful diys and has been featured in several magazines. Yeah, that's how perfect her house looks. Magazine worthy! The name of her blog is Dear Lillie. I just can't get enough. So she sells these amazing Ruler Growth Charts in her shop and I actually found a woman at a garage sale making and selling her own version as well (for around $60). I knew that I could re-create it for less. So I figured I would give it a try. Mine didn't turn out quite as nice, but I was able to make it for $15! And I love it. It's such a fun thing to have in the house for keeping track of how big the girls are getting and it has that perfect natural, rustic feel. Here is the how-to.
You will need:
A 9" X 6'-7' "common board" (You can really do any size or type of wood you want, but keep in mind you don't want it to be too heavy for hanging) The nice guys at the hardware store should be able to cut it for you (as they come much larger than this), if you can find someone, that is. The board cost me about $14 and I had all the other things I needed on hand.
4" Number stencils (There are many different fonts you can use)
Wood stain (I used American Walnut, but there are tons of shades and colors)
Black craft paint
Polyurethane
Painters tape or masking tape
Step 1. Stain the board. No need to sand it. I recommend doing this outside or in the garage as it is very fume-y. Wear gloves and protect the area where you are working. They call it stain for a reason. Oh yeah, and don't wear clothes that you care about. I was wearing a brand new white shirt one of the days I was working on it and as I was hammering the lid back on the stain can, it sprayed everywhere on me! Lesson learned! Allow the board to fully dry.
Step 2. Tape with painters tape, about 2 inches in, all along the board. This will help your tick marks to be straight.
Step 3. Line up a measuring tape next to the board so that you can see where the tick marks need to go. Tape so that your tick marks will be about 3/4 inch wide.
This part is tedious, so be prepared. Make the tape as straight as possible so that your "tick" marks come out straight. As you can see, I kind of folded the masking tape down the middle to make narrower strips.
Go down the entire board.
Step 4. Paint the lines, skipping every third line (as these will be the longer tick marks) and allow to dry completely before removing tape.
Step 5. Re-tape for the longer lines (meaning you will have to bring the very first piece of tape that was laid, i.e. the blue tape, out a bit) and then paint. My shorter tick marks were a little under 2 inches and my longer ones were 4 inches. Allow to dry, then remove all the tape.
So now you should be looking like this.
Step 6. Using a number stencil of your choice, paint the numbers at every fourth long tick mark. Depending on the length of your board, you should only end up to 6 or 7 feet. Allow to dry, then your growth chart is finished!
Hang anywhere. This would be cute in the kitchen, in a child's bedroom or I just put ours in the girl's playroom.
This is what we used to hang ours. We used one at the top and one at the bottom of the board. That way the board hangs straight and doesn't sway around at the bottom. Since the board was going to be in the playroom where it could easily be knocked around, I thought (actually my husband thought) that this would keep it the most secure. And he was right. It's not going anywhere.
Hope you are all having a wonderful start to the week!
You will need:
A 9" X 6'-7' "common board" (You can really do any size or type of wood you want, but keep in mind you don't want it to be too heavy for hanging) The nice guys at the hardware store should be able to cut it for you (as they come much larger than this), if you can find someone, that is. The board cost me about $14 and I had all the other things I needed on hand.
4" Number stencils (There are many different fonts you can use)
Wood stain (I used American Walnut, but there are tons of shades and colors)
Black craft paint
Polyurethane
Painters tape or masking tape
Step 1. Stain the board. No need to sand it. I recommend doing this outside or in the garage as it is very fume-y. Wear gloves and protect the area where you are working. They call it stain for a reason. Oh yeah, and don't wear clothes that you care about. I was wearing a brand new white shirt one of the days I was working on it and as I was hammering the lid back on the stain can, it sprayed everywhere on me! Lesson learned! Allow the board to fully dry.
Step 2. Tape with painters tape, about 2 inches in, all along the board. This will help your tick marks to be straight.
Step 3. Line up a measuring tape next to the board so that you can see where the tick marks need to go. Tape so that your tick marks will be about 3/4 inch wide.
This part is tedious, so be prepared. Make the tape as straight as possible so that your "tick" marks come out straight. As you can see, I kind of folded the masking tape down the middle to make narrower strips.
Go down the entire board.
Step 4. Paint the lines, skipping every third line (as these will be the longer tick marks) and allow to dry completely before removing tape.
Step 5. Re-tape for the longer lines (meaning you will have to bring the very first piece of tape that was laid, i.e. the blue tape, out a bit) and then paint. My shorter tick marks were a little under 2 inches and my longer ones were 4 inches. Allow to dry, then remove all the tape.
So now you should be looking like this.
Step 6. Using a number stencil of your choice, paint the numbers at every fourth long tick mark. Depending on the length of your board, you should only end up to 6 or 7 feet. Allow to dry, then your growth chart is finished!
Hang anywhere. This would be cute in the kitchen, in a child's bedroom or I just put ours in the girl's playroom.
This is what we used to hang ours. We used one at the top and one at the bottom of the board. That way the board hangs straight and doesn't sway around at the bottom. Since the board was going to be in the playroom where it could easily be knocked around, I thought (actually my husband thought) that this would keep it the most secure. And he was right. It's not going anywhere.
There you have it! Your very own rustic growth chart. And by the way, if you don't like the colors of this one, you can customize it however you like. The woman I saw selling these at a garage sale had Seahawks ones. They were really cute!
This girl is getting too big. Almost 4 whole feet with her bun in. :)
Subscribe to:
Posts (Atom)