Tuesday, January 21, 2014

Rose Shadow Box

One of my resolutions for the New Year was to get my projects done. Like the ones that have been sitting around FOREVER and they are always in the back of my mind saying, "When are you gonna get around to this Brooke?" I have been thinking about doing this project for years. Back when my husband and I were dating (which scary though it is, was years ago) I started collecting and drying the roses because I knew I wanted to do this one day. And the dried roses have been sitting in a plastic container waiting in limbo ever since. So this project was at the top of my to-do list.
Since the roses have special meaning, I wanted to keep them all somehow, but in a way that didn't leave me with huge bouquets hanging around. I hate clutter, but I think there are ways to consolidate and keep things in a special way. So every time he gave me some roses, I would dry them and put a tag on them stating the date and occasion. All I had to do was get the shadow box. I looked for YEARS for this stupid shadow box. No one sells shadow boxes, in white, in the size I wanted. If anyone finds one let me know! So anyway, since I couldn't find the right thing and I was bound and determined to get this project done, I bought a black shadow box and outfitted it to make it the way I wanted. Here is how I did this project.

You will need:
A black shadow box 26 1/4 X 8 1/4 inches (or if you can find white it will save you a lot of trouble!)
Sandpaper or a sander (I had my husband go out and buy a sander after getting super frustrated and let me tell you, it was the best buy ever!)
White paint (I just used a sample white paint from Home Depot)
Paintbrush
Khaki colored linen
Spray adhesive
Small (I'm talking TEENY TINY) bridal pins. Mine were 1/2 inch.
Tags (Mine were a Martha Stewart brand)
Dried roses or other memorabilia from your honey

1. Start by lining the glass of the shadow box with paper and painters tape. If you can remove the glass that would be easier, but mine couldn't be removed. Then sand and paint the box on all sides, being careful to get the inner edges of the box (nearest to the glass) as well. Since the box is black, you will need to do quite a few coats of the white paint to cover it. Make sure to let it dry thoroughly between each coat. Otherwise you will end up with a sticky mess. TIP: If you get paint on the glass, remove with some nail polish remover.

2. Cut your linen in 5 separate pieces to fit the inside of your box. Spray with the spray adhesive, then apply to the inside of the box.

3. Trim your roses (or flowers) to size, so that they are able to fit inside the box.

4. Then pin to the back of the box with the bridal pins. I found a few different sizes of pins to use, but found that the smaller ones looked the best.  After labeling your tags with the date and occasion, pin next to the rose it goes with. I was originally going to tie the tags on the roses with a ribbon or thread. And after I tied like 8 teeny tiny bows, I decided it would look better if the tags were just pinned next to the roses. That way you could read the tags better too.

5. Carefully close the box back together. The pins hold everything in place, but its not like they are super glue or anything, so a little bump could knock them off.

Done! Hang in a place where you can enjoy it. I decided to hang mine right outside our bedroom door. So every time we pass it, we can see how far we have come and remember those sweet first years.


Hope this post has inspired you to create your own special shadow box. Its a great gift idea too. Valentine's Day is coming up!

Friday, January 17, 2014

Toddler Bubble Skirt

Happy Friday Friends!
Yesterday I showed you the 2nd look in the Wee People Look Alike Series I am doing and today I am going to show you how I made the cute flannel bubble skirt! Its the perfect cozy skirt for Fall and Winter and will help keep those little leggys warm!

This skirt tutorial is for 2T-4T

You will need:
About 1 yard of fabric (I chose flannel but cotton will work well if you want to make it a Summer skirt)
Plain cream fabric
1 inch wide elastic
Sewing materials
Thread

1. Keeping your yard of fabric folded, cut a 42X10 inch piece. (So unfolded it would be 42X20).

2. Keeping it folded, (the fold is going to be your "bubble") sew along the long side opposite the fold. Do not reverse! Then pull either side of your thread and make a ruche. Keep ruching until the length comes out to 27 inches.

3. Cut a 5X27 inch strip of cream fabric and fold in half lengthwise.

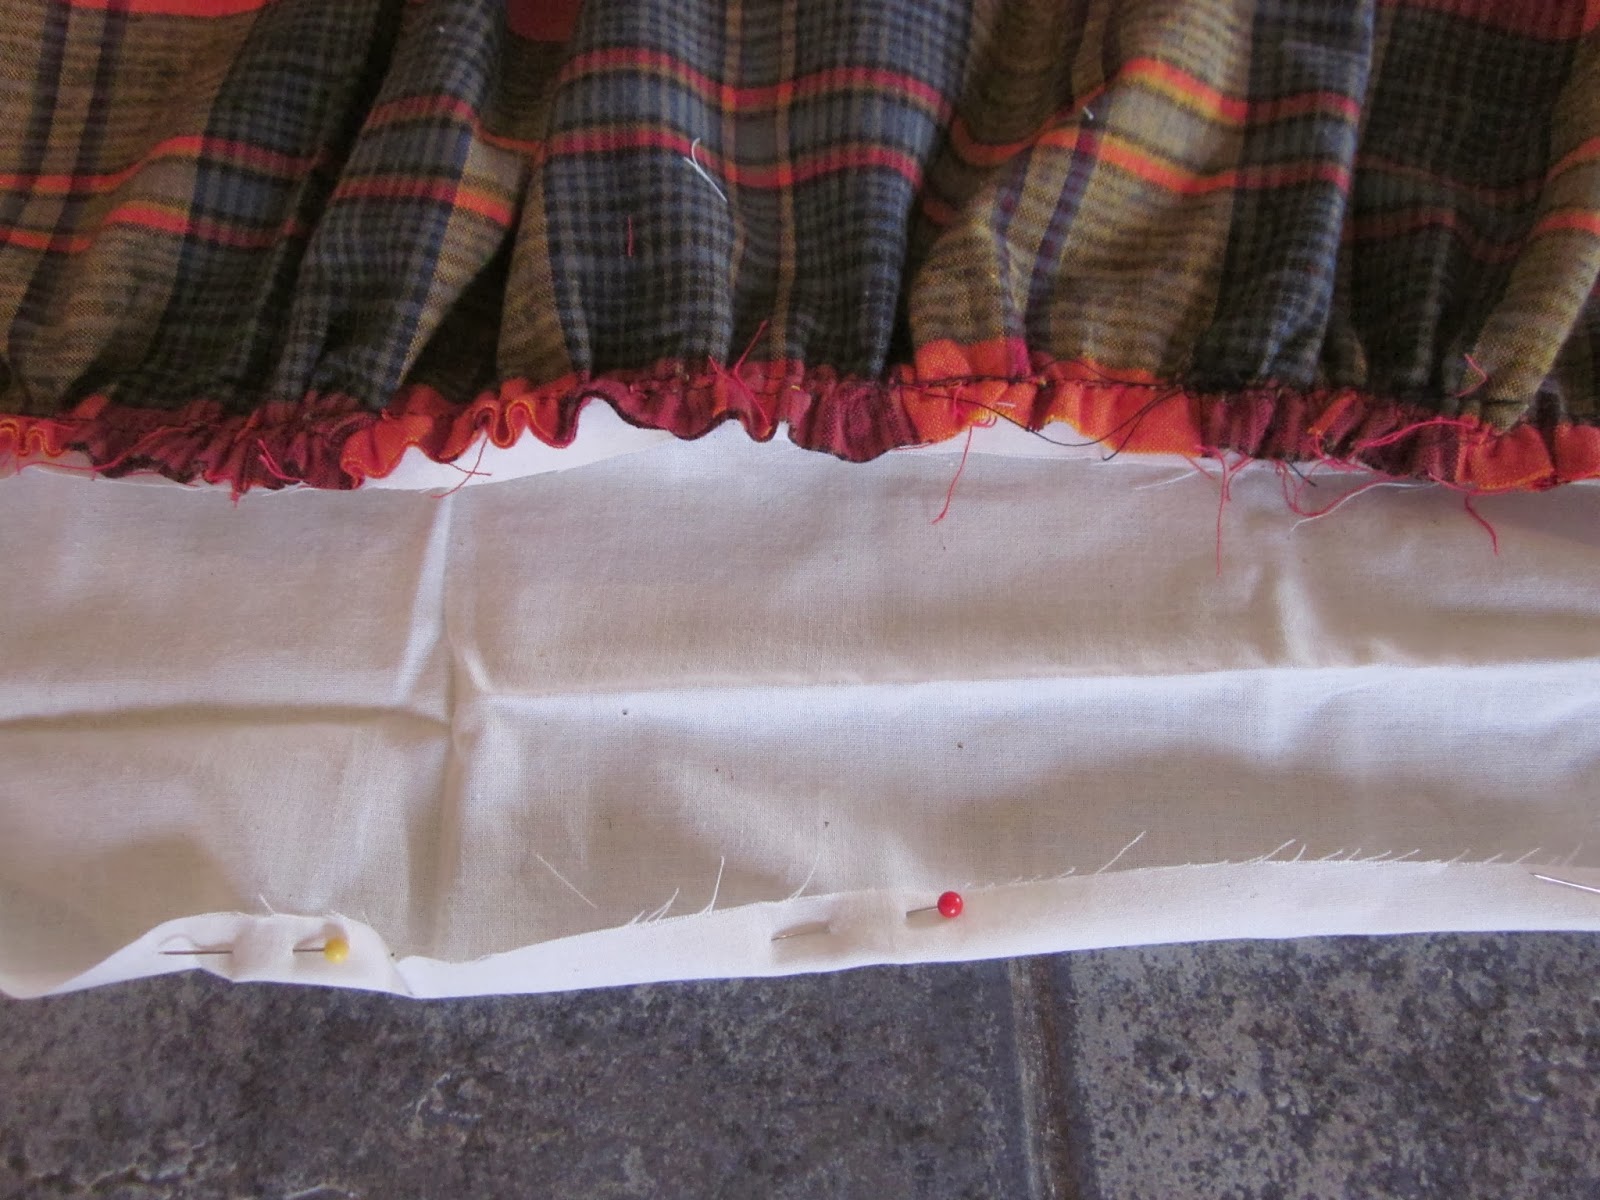
4. Placing the pretty sides together, pin the strip of cream fabric to the top of your ruched flannel fabric. This is going to be the waistband. Sew down.

This is what your skirt should be looking like at this point.

 5. Pin down about 1/4 inch of the raw edge of the cream fabric then sew down.

6. Flip over the cream waistband and iron down to make a crease.

7. Line the un-sewn side of the waistband up with the opposite side. Pin down, making sure that it is lined up the whole way and that the ruching is tucked up under far enough.

 8. Sew closed.

9. You should now still have an opening on the waistband. Pin a large safety pin onto your 1 inch wide elastic and string it through the waistband, making sure the opposite side doesn't get lost.


 10. Sew the elastic closed.

11. With the pretty sides (or the outside of the skirt) together, pin your skirt closed. Then sew down. I also used the zig-zag stitch to keep it from fraying when it goes through the wash.


12. Hand stitch the waistband opening with matching thread.

Done! You have just made a bubble skirt! Your little girl will be pleased.


I'm not making any promises, but I would like to do a skirt similar to this with a pocket some day. So keep checking back. Have a great weekend everyone!

Thursday, January 16, 2014

Wee People Look Alike #2

Back in September, I started the Wee People Look Alike Series, in which I would take outfits from the original Wee People line (from the brand Free People) and make/assemble a copycat version of it. Because as some of you may know, there no longer IS a Wee People line. And I think the mothers and daughters of the world have been robbed! You can see Wee People Look Alike #1 here. Today I'm excited to show you the Wee People Look Alike #2! I've been working on all of them at once, so its taken me awhile to get even one put together. But here it is! I've named this one, The Little Scot.

Here is what I put together.
Doesn't she look like a little Scottish girl? I love that I was able to use some of my soft cozy flannel for her skirt. Its a nice fabric to have for a little girl who insists on wearing skirts in the middle of Winter.
 Stay tuned tomorrow for the bubble skirt tutorial.
 Princess is always up for trying on a new skirt, so she was pretty excited to model for this project.
 As you can see.
The colors ended up being a little darker than the original, but I like the way they turned out. The dark colors are so very cozy Winter. The Wee People version is actually a dress, but I thought I would change it up a bit and make it a skirt and shirt combo. Princess has an abundance of dresses!

Boots: Old Navy
Black tights: Children's Place
Skirt: Made my me! Tutorial will be posted tomorrow.
Shirt: Baby Gap
Sweater: Nextdirect.com

Hope you all enjoyed Wee People Look Alike #2!


Wednesday, January 15, 2014

The Best Blueberry Muffins In The World

I don't know what is wrong with me lately. For some reason I have been in stock-up survival mode. I have just had the urge to stock up my freezer with dinners, breads, soups, etc. Its totally like a pregnant woman in the third trimester! I don't know if its because its January and the constant cold has my instincts going crazy or what. But anyway, that's what I have been doing lately. One of the things I really like to make is these amazing blueberry muffins. I make a big batch and then the kids have breakfast for the week and I can freeze any extras. They are also perfect for on the go breakfasts or Sunday brunches with friends. And they are SO GOOD! As a kid, I remember picking out each and every blueberry I found in a blueberry muffin. I didn't like the texture, but I liked the taste of the rest of the muffin....but not these! These are so yummy, I have to be careful not too eat too many as they come out of the oven. And my kids are weird and love fruit, so they of course love them. Actually Princess is under the impression that muffins are "cupcakes"......I'm not about to correct her.


The Best Blueberry Muffins In The World 


Ingredients:
7 Tbls. Unsalted Butter
3 Tbls. Sunflower Oil
1 Cup Plain Greek Yogurt
2 Tsp. Vanilla Extract
3 Eggs
3 to 3 1/4 Cups Flour
1 Tbls. Baking Powder
1 Cup Evaporated Cane Sugar (Regular sugar works as well)
1/4 Tsp. Salt
6oz Blueberries
4oz Cream Cheese
Raw Sugar for sprinkling

Directions:
Preheat oven to 400F degrees. Sift together Flour (Start with 3 cups for now), Baking Powder, Sugar and Salt in a large bowl and then make a well in the middle. This basically means to make a dent in the center (much like a bowl) of the flour mixture. Set aside. Melt butter either in the microwave or on the stove top. Allow to cool slightly, then mix with the Oil, Yogurt, Vanilla and Eggs. Pour the wet mixture into the well of the flour mixture. Carefully, with a rubber spatula, fold together the ingredients. Do not mix completely. Batter will be lumpy and that's ok. If the batter is too wet, add the last 1/4 cup of flour, but it may not need it. Mix in the blueberries. Line 1 and 1/2 muffin tins with cupcake wrappers. I always end up with about 18 muffins. Pour about half the batter into the prepared muffin tins. Then place a dollop of cream cheese on each. Then cover with the rest of the batter and place another dollop of cream cheese on the top. Sprinkle with raw sugar. Bake for 20 mins or until muffins are just starting to get golden on top. Eating them fresh out of the oven is the best way....sometimes with a little butter.
Store in the fridge for a week or the freezer for 3 months.  


Tuesday, January 14, 2014

Vintage Magazine Holder

I am a big collector of magazines. Not all magazines...just like cooking ones and home improvement ones. I dog ear their pages and then they get stacked away safely for me to go back to whenever I need an idea or a recipe. Every once in a while I have to go through and tear out the dog ears just so that I have room for all of them. I have 3 binders full of recipes I have found and collected over the years. Whenever I am wanting something new to make I lug out those heavy binders and scour through the pages. I don't think there has ever been a bad recipe. Except one that my husband didn't like....but he is crazy, because it was good. You know how they say, "Don't judge a book by its cover."? Well, I'm telling you now, that you definitely should judge a recipe by its picture. Its never fails. Those pictures of food that look over food styled? Yeah, that's because its a boring recipe and they are trying to make up for it. Only make what appeals to your eyes and you'll do pretty well, I promise. Anyway. Since I have an abundance of magazines laying around the house, I was really excited when I found this idea from Emilia's New Moon. A vintage crate magazine holder!
   repurposing
So cute and so fitting with our rustic style. All I had to do was find an old antique crate...And a quick trip to a nearby antique store solved that problem. There were actually quite a few to choose from. The crate I found had some VERY old and worn out writing on it and I wanted to be able to see the writing. Part of the charm right? So I decided to paint over the letters and darken them up a bit. I just used some black craft paint.

Then all I had to do was bat my eyes at my husband a few times to get him to screw the wheels on. Ask for "Casters" if you are heading to Home Depot by yourself. I may have been able to screw them in myself....but since this was such a delicate project, I decided to leave it to the man.


Be sure to use the shortest screws you can find to screw on the casters (wheels). And depending on the thickness of the wood on your crate, they may poke through a little bit. Mine do a little, but since its only magazines going in there, it should be fine.  

 I love how it turned out.
 I think I may have my husband add some pulls on either side for a little extra flair.
This would be a perfect thing to store blankets or pillows in as well. Just be sure that your screws aren't poking through if you decide to use it for that because you don't want the screws tearing holes in your cozy treasures.
Hope this inspired you to re-purpose some of your own vintage treasures!

Friday, January 10, 2014

Dress-Up Rack

Happy Friday Friends!
I thought I would show you one last fun present that the girls got from "Santa" this past Christmas. It's too cool not to share. We had been having storage issues for all of the pink and purple...and pink princess dresses and skirts. Most of the time it all ended up stuffed into a corner of their playroom. I knew a solution had to be found. Then I found the perfect thing....on Pinterest. A Dress-Up Rack. You can find the original instructions here. I decided to change the colors to make it a bit more our style and then we made it a little taller than the one in the tutorial also. But the rest is the same. I can't really take credit for this one. I just found the idea and instructions and then handed it over to the husband.....er....I mean Santa. Who did an amazing job! I wanted to give it more of a rustic look, so instead of painting the base blue, we sanded and stained it a gorgeous wood color, then we painted the piping a beautiful copper color. I love copper so much. I have had a can of copper spray paint just waiting to be used for something fun and I was so excited to finally use it. The cool thing about this project is that you can make it in just about any combination of colors. You could even make an adult sized clothes rack for some fun extra storage in your room. All you need to do is change the measurements. Anyway. Here is what Santa and his elves made for the girls this Christmas.


See what I mean about the purple and pink? Yikes!


Talk about cool storage! I want one too!


Here you can get a better look at it without all the stuff on it.


They seem to enjoy using it as a stage also.

 Oh my little girl. I can't get enough of her cuteness.


Enjoy the weekend!