Friday, January 31, 2014

Hearts On A String

Dear, Friday

Roses are red
Violets are blue
I got outta bed
Because I love you!

Even if you work on Friday....no one REALLY works that hard on Friday. You just kinda show up (hair half dried, teeth half brushed), check emails, browse the internet, while dreaming of what to do tonight....then you go home and get your lovely weekend started. And today I have an easy Friday craft that you can make quickly over the weekend as well. Hearts on a string. Even if you don't have any other Valentine's decorations up in your house, these are so pretty by themselves. There are endless possibilities for variation too. And they are so easy, you can put them all over the house. I made a garland similar to this (using felt hearts instead of paper) last year and it turned out so cute. You can catch a glimpse of it in my Yarn Wrapped Letters post. 

You will need:
Pretty Valentine's Paper
Heart cookie cutter or stencil
Pen
Thread
Sewing machine

1. Cut out several heart shapes in varying colors of paper.

2. Using your sewing machine, carefully sew down the middle of one heart, then continue on, sewing down the middle of another heart. Continue until you reach the desired length. The thicker the paper, the easier it is to deal with. But any paper works really. Just don't sew your fingers!


3. Hang in bunches in your windows.


Aren't they pretty!?


Thursday, January 30, 2014

Heart Pillow

I love rainy days like these. It makes me just want to curl up in bed with some comforting food (Homemade Mac and Cheese sounds perfect) and watch movies all day. It's the kind of weather, where if you are out and about running errands your home just calls to you to, "Come home!", "Come get cozy!". I love it. Today's project is perfect for this type of day where you just want to snuggle on the couch. In addition to being great Valentine's decor, it also works as an every day accent pillow. My little Princess seems to love it quite a bit too....The last thing she needs is another fluffy thing in her bed. Her bed is so full of stuffed animals, she can barely get in at night!

You will need:
Some cotton fabric (I used two different patterns so that it would be different on each side)
Sewing materials
Stuffing
A Tea stained doily (You can see my tutorial on staining doilies here.)
A stencil or other heart shape
A light washable marker

1. Trace a heart shape onto your first piece of fabric using a washable marker and cut out. Repeat with the second fabric. For my stencil I used a heart shaped plate I have. You can always freehand it if you don't have any heart shapes around.


2. Pin the pretty sides together and sew most of the way around the heart. Leave an opening for the stuffing.


3. Flip right side out and stuff with fluff. Winnie the Pooh style.

4. Pin the hole closed and hand stitch to close it.


5. Pin the doily on the pillow. Play around with different places to put it. I found there were lots of ways that it looked cute. Sew all around the edges of the doily to attach to the heart.


Finished!


Other ideas to make this pillow even COOLER!

* When you are stuffing the pillow with fluff, add some dried lavender. It will smell so good and will be so relaxing, everyone in the family will want it for movie night!

* You can make the heart smaller and add a little pocket on the front (for messages). Use as your family's heart pillow. Whenever anyone leaves town or goes to a slumber party, they take a little bit of the family with them so they won't feel apart.

* If you know a little girl who doesn't have an over-abundance of stuffed animals (like my daughter) this would make a cute gift.


Wednesday, January 29, 2014

Cupid's Arrows

Looking for an easy Valentine's craft to do with the kids? Look no further. These little arrows shot from Cupid (of course) are the cutest and so easy! I used mine for decoration and spread them around the house, but these would be so cute as a homemade Valentine for your kid's school or party! They would make a great party favor too if you are throwing a Valentine's party this year. Or you could hang a bunch of them from a chandelier. Or you could attach it to a gift for your honey. Tons of ways to use these cute little things.

You will need:
Valentine's Themed Scrapbook Paper
Valentine's Themed Washi Tape
Valentine's Themed Paper Straws (P.S. Right now all Valentine's stuff is like 40% at Micheal's)
Heart Shaped Cookie Cutter
Pen
Scissors


1. Using your heart cookie cutter, trace 2 hearts on the scrapbook paper and cut out.

2. Tape the straw to the top (inside) of one of the hearts.

3. Place a couple of pieces of tape (doubled over) on the inside of the heart and secure the other heart to it.

4. Secure two (facing) pieces of washi tape to the top of the straw. Trim to make it look like feathers. I did mine in a few different ways. Look at the finished pictures to see. That's it!

Cupid's Arrows! Watch out, or you might fall in love!


There are so many ways to use this sweet little V-Day craft. What ways can you dream up?


Have fun!

Tuesday, January 28, 2014

Yarn Wrapped Letters

It's getting romantic around here! I just made my very own Yarn Wrapped Letters and they are so cute! It was a little bit more challenging than I thought it would be, but the great thing is that you need very few supplies to make them. They are soft and romantic, just like Valentines! And you can put them almost anywhere. It's actually a pretty cute gift idea for a mother or best friend too. Here's the how to.

You will need:
Wood or Cardboard Letters (purchased from craft store)
Colored Yarn
Scotch tape or glue
Felt and embroidery floss for embellishments (Optional)


1. Tape one end of yarn to the back of your letter.

2. Then start wrapping the yarn around the top of the letter so you get that part covered before moving on. Try to keep the direction of the yarn as uniform as possible. You may need to unwind and redo it a few times before you get the hang of it. But basically you wrap one direction, then you wrap another direction to cover it and make it all uniform to make it LOOK like its all going the same direction. Confusing?


3. Finish it off by taping or gluing the end to the back of the letter. I just taped mine. Then snip the yarn.


Some letters are easier than others. The O was really easy and the E was really hard.

But with a little patience, you can do it!

4. Repeat with all of the letters.


5. If you want, you can add a little flower, button or other embellishment to add a little something extra to one of the letters. But they look just as cute without!

Place on a mantle, dresser, windowsill. Wherever!


Love is all you need!

Monday, January 27, 2014

5 Minute Valentine Jars

I know, I know. Valentine's is still a few weeks away. But I have been thinking about doing Valentine's stuff since, well.....Christmas. So I decided, "You know what? Screw it! I'm doing Valentine's and I don't care what anyone says!". My husband and I are going to be out of town on Valentine's too, so I'm feeling a little guilty about not being with the girls that day. So we are going to do our celebrating a few days early. We started our decorating the other day. You can imagine Princess was pretty excited about all the red, pink and hearts coming out of our Valentine's decoration box. As you have probably noticed, I like to add a few more things to my holiday decoration collection with each new holiday that comes around. That way you can build the collection gradually. These Valentine Jars are so simple and you may have even seen them before. They are great because you can use them as decoration or fill with some cookies or candy for an easy gift! And the best part? They maybe take less than 5 minutes.

You will need:
Mason Jars
White doilies
Red construction paper
Red and white baker's twine
Scotch tape


1. Start by cutting out some hearts. You can use a heart cookie cutter for this. Or just use the grade school trick of folding the paper in half and cutting out a half heart. Works every time!

2. Layer your heart against the white doilie and secure with scotch tape. Then tape on the front of the mason jar.


3. Wrap some baker's twine around a few times (the less perfect the better) and tie in a bow.

There you go! Cute and simple decor (or gift wrap) for Valentine's day! You can fill the jars with flowers or branches from the yard for a little something extra, but they look adorable just as they are. It doesn't get any easier than this!


Thursday, January 23, 2014

Juicing

For the last few years, my husband and I have started the New Year by doing a mini juicing cleanse for the first week of the month. Nothing huge. We just replace one meal every day (usually lunch) with a juice. It never ceases to make us feel energized and fresh. Juicers can be expensive. Not to mention good produce. But I swear, its the best purchase we've ever made. I use that thing all the time. Whenever I need that extra boost of healthy fruits and vegetables, (or if I've been eating like crap) I just run 'em through the juicer and voila! Its amazing. Its great because you can not only make mixed juices, but also regular fresh juice. Like orange and apple juice. Free from any extra sugars or additives they usually have in store bought. I thought I would share with you my two favorite cleansing juice recipes.

Queen of Hearts

Ingredients:
5 or 6 Kale Leaves
2 Sweet Apples (Such as Honeycrisp/ Gala or Braeburn)
1/2 Red Cabbage
1 Red Beet
1 Bunch of Grapes

Directions: Juice together. I suggest straining it as well. Sometimes you can get bits of leaves in there and personally, if I get one of those it makes me gag.
Don't be afraid of the beet! I promise you won't taste it! The sweetness of the apples and the grapes overtake it. You can also add half a lemon if you really just can't bear the thought of tasting the beet. Although you won't, I swear! Just make sure to peel the lemon and cut the ends off. They can be hard on your juicer.

If you still don't want to try beets, let me share with you some of the great health benefits they offer. Aside from offering numerous vitamins and minerals, they cleanse the blood and liver and may prevent many different forms of cancer. They are also good for your mental health and can help with strengthening your memory. Since having 2 children has fried my brain, that's one thing I love about them. Oh, and its also a natural aphrodisiac, so....

Dragon Juice

Ingredients:
10 Kale Leaves
2 Green Apples
2 or 3 Celery Stalks
1 Handful of Parsley
Either 1/2 Lemon (peeled) or 1 Small nub of Ginger

Directions: Juice, strain and serve. One note about juices. They can last up to a day and a half, but no more. They will start turning brown and smelling, so its best to drink them freshly juiced!

Most of you have probably jumped on the Kale bandwagon, but in case you haven't tried it yet, here is some motivation. Kale is high in iron, more so than beef! Its high in vitamins and antioxidants, making it another great cancer fighting vegetable. It is also good at cleansing and detoxifying your body and promotes a healthy liver immune system and can lower cholesterol. Do you need anything else?

There are tons of great recipes online and many great juicing recipe books as well. Its really fun to experiment. You can juice pretty much any vegetable you can think of! Enjoy!


Note: These are my opinions and I am in no way a nutritionist expert or a doctor. Juicing may not be for everyone. Use your judgment and be sure to consult your doctor if you have any concerns.

Wednesday, January 22, 2014

Revamped Stool

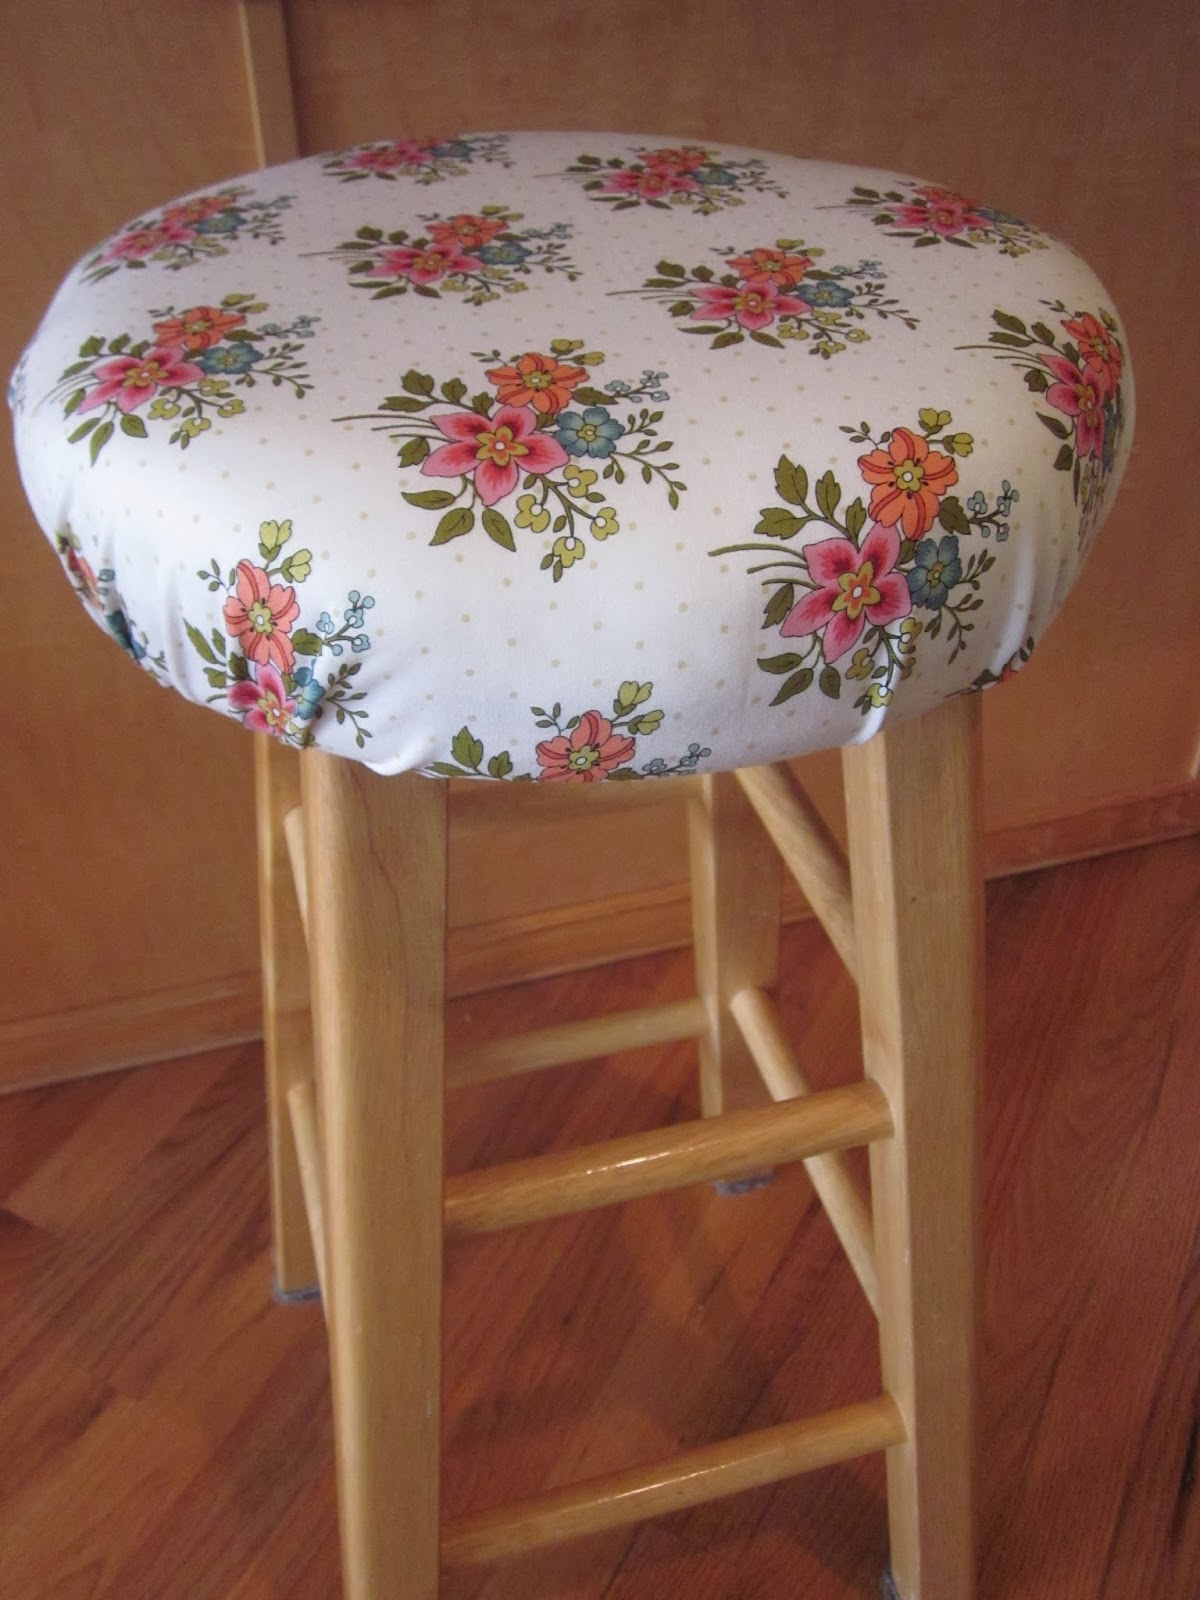
Sometimes when I am wanting something new, I just have to force myself to look around and say, "Okay, what can I MAKE new? What can I make better? How can I turn this ugly thing into something I like?" Because ultimately I get the same pleasure out of it as if I were buying something brand new. We have these simple kitchen stools that we have had for a while. I know I had the same exact ones in college so they could be the very same ones, but I'm not sure.


Anyway. They are plain and simple. They work, but they could definitely be a lot cuter. I decided they could use a little love. A new look for the new year. Some color and some style! I found a great video tutorial for adding fabric cushions to stools from Lauren Conrad's Blog (I know, I know. Don't laugh at me!). You can view the video here. And here is the how to.

You will need:
Old stools
Foam padding (Sold at craft stores and fabric stores)
Fabric to cover them
Adhesive glue (This stuff comes in handy!)
Staple gun (I didn't have one of these and I thought it was well worth buying for future projects)
Staples
Scissors
Exacto knife
Hammer
Marker

1. Lay the stool upside down on top of the foam padding and trace a circle around the round top of the stool with your marker. This way you are using a perfect stencil for the size of pad you need. Cut the circle with an exacto knife. It takes a few times around to get all the way through the foam.


2. Spray the top of the stool with the adhesive spray and stick the foam circle on top of it.

3. Cut a large square of fabric out (better to be bigger, just in case) and then lay the stool upside down, on top of it.


4. Pulling the fabric tight, start stapling it to the underside of the stool. Go all the way around, basically making a circle with the staples. Hammer down the staples that don't go in all the way.

5. Trim any excess fabric as neatly as you can.

Now you have a brand new stool!


You can use almost any type or pattern of fabric for this project to fit with your decor. Linen would be really nice and would go with pretty much any style.

I am loving how fun and fresh my stools look now!